The Tanzu Kubernetes Grid managed service – Exploring Integrated Services Configuration
The Tanzu Kubernetes Grid (TKG) managed service is included as part of the basic offering of VMware Cloud on AWS. Users can run, deploy, manage, and operate Kubernetes clusters on top of VMware Cloud on AWS, like they can with on-premises vSphere. The SDDC console provides a mechanism to enable TKGs on a selected cluster within an SDDC.
Note
To enable TKG, a cluster should have at least three hosts.
To activate TKG, you need to open the SDDC console, and inside the specific SDDC under ACTIONS, select Activate Tanzu Kubernetes Grid. This will initiate the deployment wizard for TKG, as shown in the following screenshot:
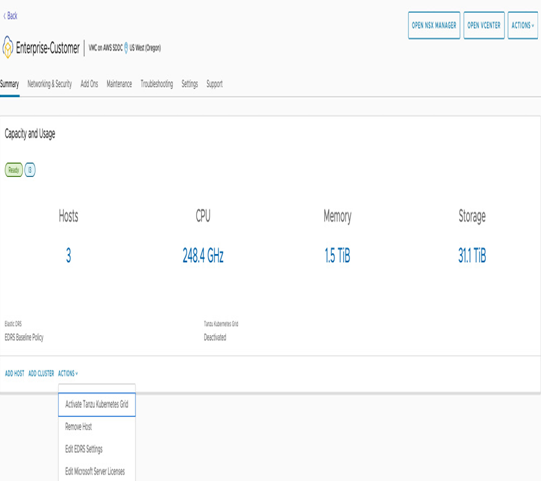
Figure 7.65 – Activation of vSphere with Tanzu
On the first screen of the wizard, you will need to fill in the networking details of the service CIDR used within the Tanzu Supervisor Cluster for Kubernetes Services, such as ClusterAPI and etcd. Namespace Network CIDR defines a new vSphere namespace. To support this namespace, a new tier-1 router with a segment from this pool will be created. The Tanzu Kubernetes cluster VM will be attached to it.
Ingress CIDR is used for traffic entering the environment through DNAT, and Egress CIDR is used for traffic exiting the Kubernetes environment through SNAT. Click on VALIDATE AND PROCEED, as shown in the following screenshot:
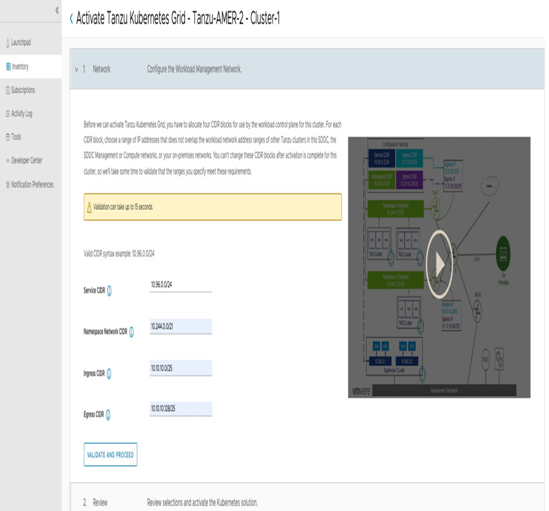
Figure 7.66 – TKG CIDR validation and activation
Now, you will see a summary of the activation parameters entered, as well as a comment that Tanzu Mission Control will be enabled together with Tanzu Kubernetes Grid; click on ACTIVATE TANZU KUBERNETES GRID, as shown in the following screenshot:
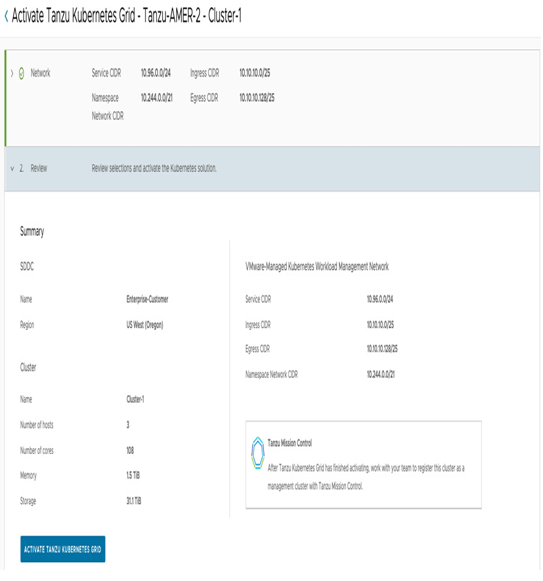
Figure 7.67 – TKG and Tanzu Mission Control activation
After service activation is complete in the SDDC console, you can navigate to the vSphere Web Client and validate the creation of a new namespace:
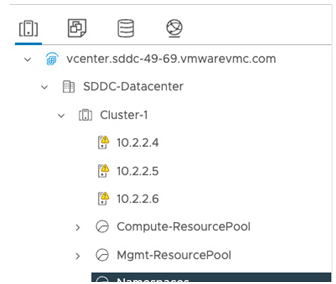
Figure 7.68 – vSphere namespaces
To provision a new vSphere namespace, which is the basis of running Kubernetes workloads, navigate in the vSphere Client to Workload Management and click on CREATE NAMESPACE, as shown in the following screenshot:
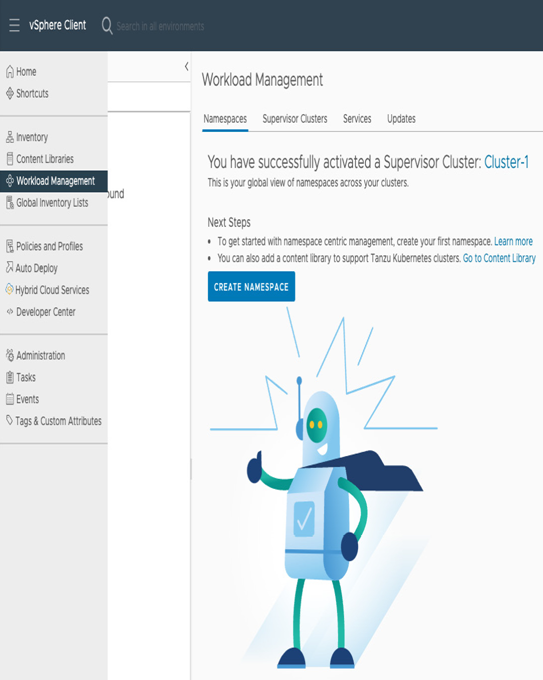
Figure 7.69 – vSphere Workload Management – creating a new namespace
Select the supervisor cluster used to create the vSphere namespaces. In our example, it is Cluster-1. In the Name section, provide a DNS-compliant name for the cluster, as shown in the following screenshot:
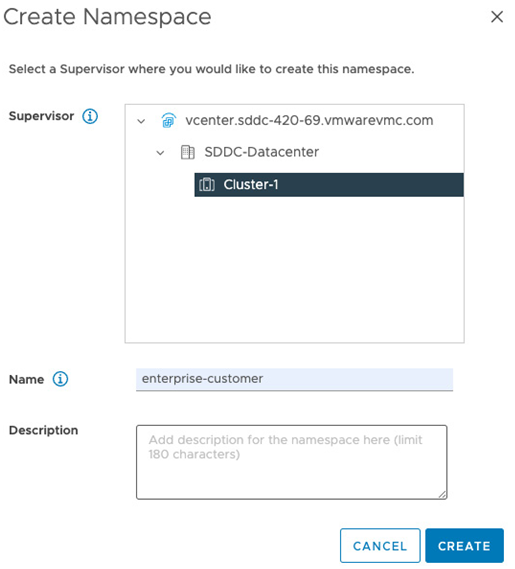
Figure 7.70 – vSphere namespace creation
After the namespace is created, users need to assign the different resources and permissions to it. To start with permissions, click on ADD PERMISSIONS, as shown in the following screenshot:

Figure 7.71 – Namespace resource and permission allocation
Unless another LDAP source was configured, the default identity source is vmc.local with the cloudadmin role, and the best practice would be to perform this configuration with a non-default identity source. We provide the cloudadmin user with the Owner role, the highest privilege role in our example. Click on OK to continue, as shown in the following screenshot:
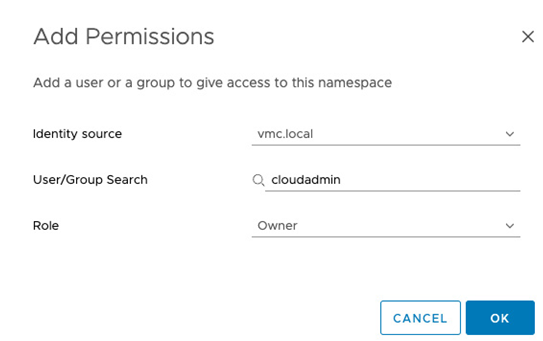
Figure 7.72 – Assigning a namespace permission
Next, click on ADD Storage, and add the vSAN storage policies to the namespace for persistent volume claims inside the Kubernetes environment. In our example, we have selected all available vSAN storage policies and clicked on OK, as shown in the following screenshot:
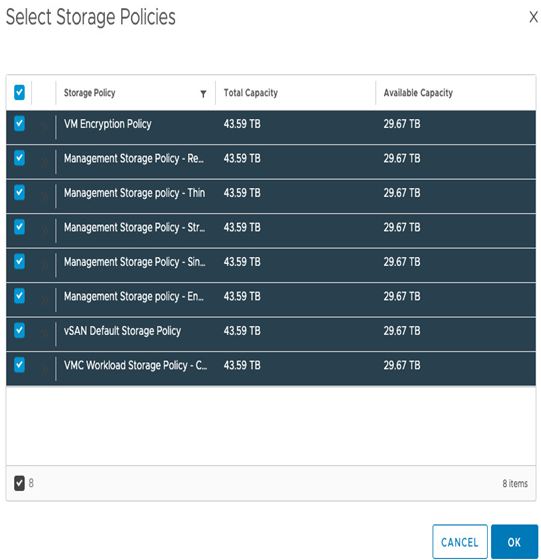
Figure 7.73 – vSAN storage policy to Persistent Volume Claim (PVC) mapping
Under VM Service, click on ADD VM CLASS, and select all of the different VM service t-shirt sizes to be consumed later as a VM service. After selecting them, click on OK, as shown in the following screenshot:
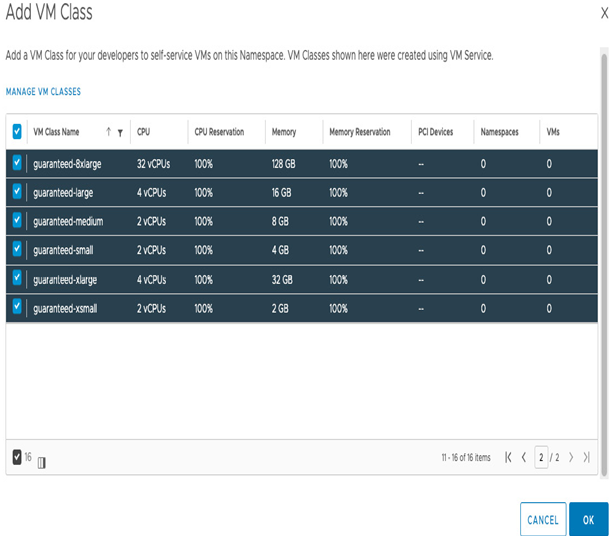
Figure 7.74 – VM service t-shirt size selection
Finally, click on ADD CONTENT LIBRARY. On the following screen, we subscribe to a preconfigured content library. It contains the latest Kubernetes software images and will be used when deploying a new Kubernetes cluster. Click on OK, as shown in the following screenshot:
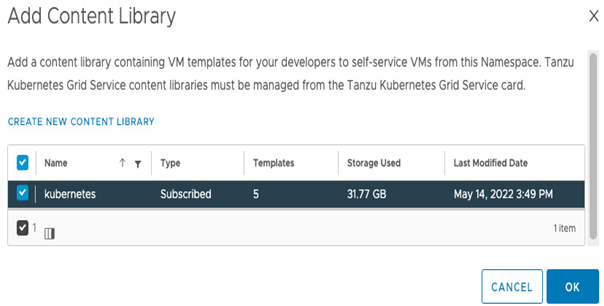
Figure 7.75 – A Kubernetes content library
Now that we have completed the activation process of the vSphere namespaces, we can continue connecting to our Kubernetes cluster and deploying Kubernetes workloads. A well-configured Kubernetes cluster should include all the parameters, as shown in the following screenshot:
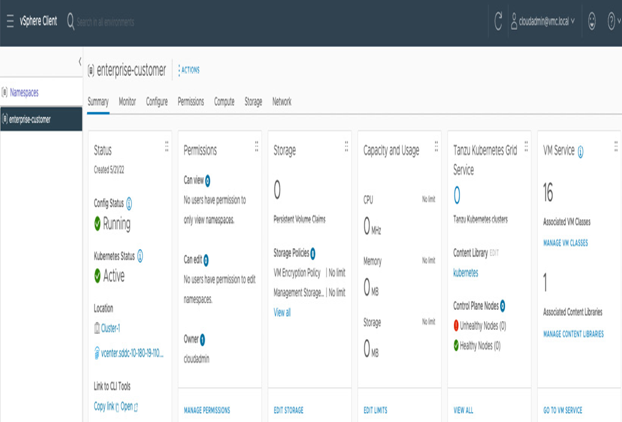
Figure 7.76 – A vSphere namespace configuration example
In this section, we described how to activate Tanzu services on VMware Cloud on AWS.
Information
For further instructions on how to deploy workloads in the vSphere environment, visit https://vmc.techzone.vmware.com/tanzu-kubernetes-grid-service-vmware-cloud-aws.
Summary
In this chapter, we reviewed how to configure VMware NSX Advanced Firewall, deploy HCX end to end, implement the different HCX migration methods, navigate and configure alert capabilities in VMware Aria Operations for Logs for VMware Cloud on AWS, and configure vSphere with Tanzu services.
In the following chapter, we’ll cover the topic of building applications and managing operations.

